Chocolate Poinsettias Tutorial – Christmas Series
Short tutorial on how I made these chocolate poinsettias filled with peanut butter cups filling, you can read more tips and details below.
Directions:
1. Fill mold with 2 coats of chocolate (allow each coat to fully set before proceeding onto the next step).
2. Add filling (the filling I made is simple peanut butter + powdered sugar + vanilla extract).
3. Add chocolate to the top and allow to fully set. Remove from mold.
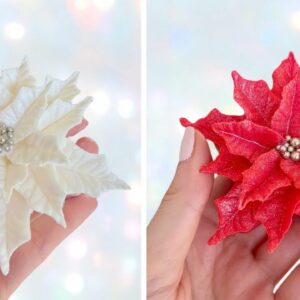
4. Roll out Gum paste and dust with cornstarch if it is sticky. Cut 5 petals of each size ( i am using 3 different sizes).
5. Using a piping tip, cut each petal to give it a “poinsettia” petal shape.
6. Dust both pieces of the veiner with cornstarch and place each petal in the middle (1 petal at a time). Apply pressure, remove the petal, and set aside. Repeat with all petals.
7. Allow the petals a few minutes to dry.
8. Apply melted chocolate on the back of the petals and place 5 for each row. Follow the star for the first row and place the second row petals in between the first row petals (same for the 3rd row petals).
9. Allow to fully set. Add chocolate in the middle + add sprinkles and dust with edible glitter.
Tools can all be found on www.nycake.com (you can use code BUTTER10 for 10% off your order).
Recipe Video: