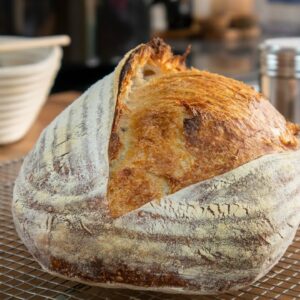
Easy Homemade Sourdough Bread | A Basic No Knead Recipe That Gives Amazing Results Every Time
An outstanding basic no kneed sourdough bread recipe that produces amazing results consistently. This is a “bare bones” recipe to help new bakers understand the process and get to grips with their first loaf without worrying about too much technique.
FULL RECIPE:
d
MOST COMMON QUESTIONS ABOUT MY NO KNEAD VIDEO:
Q
GET THE SOURDOUGH CALCULATOR:
p
WIRE MONKEY LAMES:
/>
SOURDOUGH STARTER:
s
EQUIPMENT:
Check out the Wire Monkey lames – i
Risdon & Risdon Apron: 5% discount code – Explore22
4
My Komo Flour Mill – 5% discount with Checkout code: culinaryex5
/>Bread basket: H
Bench scraper: Z
KD-8000 dough scales: 6
Precision scales: C
Bread tins: O
Challenger bread pan: />
As an Amazon Associate I earn from qualifying purchases.
IMPORTANT NOTE:
You need to use flour with a high protein content to achieve the same results. I am using a non-speciality all-purpose flour with a protein content of 13.2%
The protein content is very important as it contributes to building the gluten in the bread. You will not have the same result if you use a low protein flour such as 10% or 11%. For this recipe, I would not use flour with a protein content under 12.5%, but would ideally suggest flour in the region of 13%
You can normally find the protein listed on the side of the bag in the nutritional details
If you use flour with a lower protein content then you will probably find the dough is very wet and sticky and will not develop the gluten network required to hold the shape.
There is no kneading as time will build the gluten network. There is also no reason to keep folding this dough. The final hydration is 71% and makes for very manageable bread dough. Please note that depending on the flour you use the “stickiness” may vary.
My kitchen temp was in the region of 16-18c.
My starter is fed at a ratio of 1:1:1 (Starter / water / flour) and therefore remains at 100% hydration making future recipe calculation easy. The flour is divided into 75% white flour and 25% wholewheat flour. Again, if you have any questions let me know in the comments.
My banneton size: 25cm across the top length, 15cm across the top width, and 8cm deep. This was advertised as 500g banneton but for my use, I find 750g works best. My recipe works out to 762g which fits perfectly!
Scheduling
You can use the fridge to put the “brakes” on your baking schedule. For example, you could mix your dough at 17.00 and complete through to the end of the bulk ferment before going to bed at 23.00. In this case, you could cover your dough well, I normally use a plastic supermarket bag, and then pop it in the fridge overnight. The next day you would let the dough come back to room temperature and the shape and place it in the proofing basket.
You can also refrigerate the dough while it is in the proofing basket and hold it overnight. Just remember that you will need to flour your basket very well as the dough may have more of a tendency to stick.
You can bake your dough directly from the fridge with excellent results. There is no need to let it come back to room temperature.
Recipe Video: